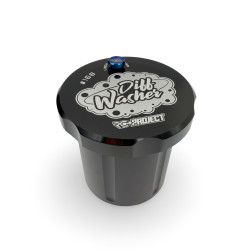
No pressure, just a perfect cleaning.
The RC-Project Diff Washer marks a real breakthrough in the cleaning of differentials, bearings and small parts for RC models.
Unlike traditional plastic containers with metal-mesh inserts, this new model stands out for its high-end materials and refined design, offering superior performance, long-term durability, and virtually no maintenance.
Weighing only 160g, it is extremely compact and easy to handle or carry, yet its internal volume is more than enough to meet the needs of even the most demanding modelers.
The container and lid are CNC-machined from solid Ergal 7075, 100% made in Italy, while the inner basket is made of AISI 316, a high-quality stainless steel renowned for its excellent corrosion resistance.
The Grade 5 titanium vent screw, treated with a PVD coating, provides exceptional wear and corrosion resistance. It allows the internal vapors generated during the cleaning process to escape, thus ensuring optimal cleaning results with no risk of pressure buildup.
Moreover, the Diff Washer is designed to be completely watertight, thanks to two NBR O-rings placed on the lid and the vent screw. These O-rings ensure a perfect seal, preventing any liquid leakage, even during transport or storage when the product is filled.
The careful choice of materials, combined with meticulous attention to detail, makes the Diff Washer a versatile, practical and reliable tool, ideal for anyone seeking a professional and durable solution to clean their RC components.
Diff Washer Instructions:
Here is how to use your Diff Washer for an easy and efficient cleaning process.
1. Preparation
Start by preparing your Diff Washer for use.
- Loosen the purge screw: slightly loosen the titanium screw on the lid. This will make opening easier. Open and fill: open the lid and pour your cleaning liquid into the container, filling it about halfway.
2. Inserting parts and closing
Once the container is prepared, you can add the parts to be cleaned.
- Insert the parts: place the parts to be cleaned in the basket.
- Close and seal: close the lid ensuring it is securely fastened, then tighten the purge screw to seal the container completely.
3. Cleaning
Now that the Diff Washer is ready, you can proceed with washing.
- Shake : hold the Diff Washer firmly and shake it vigorously for about 20 seconds. This shaking motion allows the cleaning liquid to reach all the parts, ensuring uniform and effective cleaning.
4. Removing the parts
After shaking the container, you can remove the cleaned parts.
- Loosen the purge screw : before opening the lid, loosen the purge screw. This step is important to facilitate opening.
- Drain the excess liquid: open the lid and gently lift the inner basket. Let the excess liquid drain into the main container.
- Remove the parts : once the liquid has drained, you can remove the basket containing your cleaned parts.